Tutorial: Build a Dropserver Application
Applicable Versions:
This page is valid for version 0.13.1 and above.
Let’s build a Dropserver App! We’ll go step by step to introduce concepts slowly.
We will be writing code in Typescript. By now you might know that Dropserver uses Deno as its sandbox. Any familiarity you have with Deno will be a plus.
You may want to keep these pages handy as references should you need clarification on some concepts: Dropserver’s application model and security model.
As we build the app, we will use ds-dev to run it locally. Learn how to install and use ds-dev.
Here is a video that takes you through the first few steps and illustrates ds-dev’s functionality:
1. Hello World
First, create a directory for your app code. We will refer to this directory as tutorial-app/ from now on.
Every app must include a dropapp.json file in the root of its directory that tells Dropserver how to work with the app. See the app manifest reference.
{
	"name":	"Tutorial App",
	"version": "0.1.0"
}nameof your app.versionof your app in semver format. DS uses that to sort versions of an app and offer upgrades and downgrades to the user.
Now create tutorial-app/app.ts. Here again the name is important.
We will write the minimal code needed to respond “hello world” to a request to the root path ”/“:
// The dropserver_app library contains everything
// you need to build an app for Dropserver.
import {
	createApp,
	RoutesBuilder,
	AuthAllow} from 'https://deno.land/x/dropserver_app@v0.2.2/mod.ts';
import type {Context} from 'https://deno.land/x/dropserver_app@v0.2.2/mod.ts';

// helloWorld is the handler for the request.
function helloWorld(ctx:Context) {
	ctx.respondWith(new Response("hello world"));
}

// Create a RoutesBuilder, which is a helper class for building out routes
const r = new RoutesBuilder;

// Add the route. We'll talk more about the "allow" field below.
r.add("get", "/", {allow:AuthAllow.public}, helloWorld);

// Create the app:
createApp({
	routes: r.routes
});
The createApp function from the dropserver_app library serves as a bridge between your code and the lower level sandbox API. Check the generated docs for more details.
Note:
Always import a pinned version of the dropserver_app library.
Let’s start up ds-dev to see what it looks like:
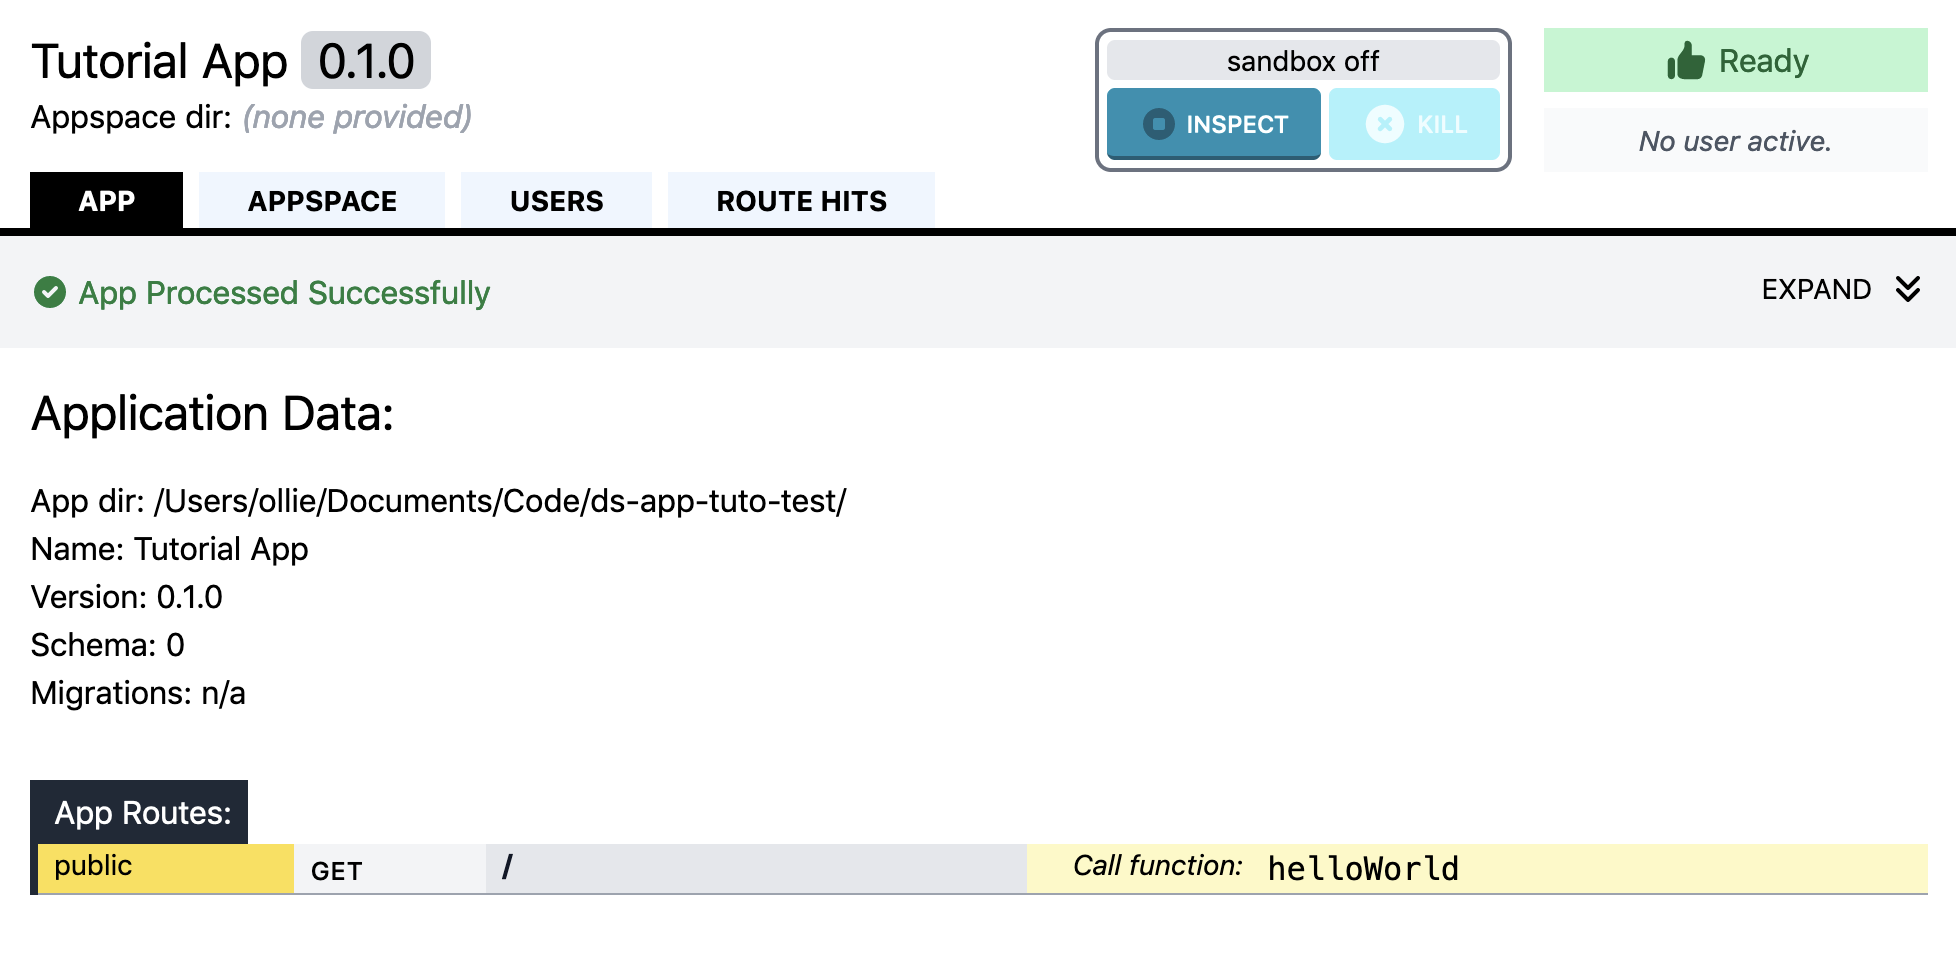
$ ds-dev -app=/path/to/tutorial-app/ds-dev will immediately run a sandbox to load your app’s configuration. Essentially it runs app.ts and collects the data that you passed to the createApp function. You can see the result by opening http://localhost:3003/dropserver-dev/ in a browser. Int he “App” tab you should see the app name and version, and the “App Routes” listing with the single public route that calls helloWorld.
Let’s hit that route by opening http://localhost:3003 in another tab and see that you get “hello world”.
Back in the dropserver-dev/ tab, notice that the “Route Hits” panel shows a hit for ”/”, along with the app route that matched.

2. Hello Stranger
A cool feature of Dropserver is that it takes care of user management and authentication for you. Let’s see it in action.
Note:
ds-dev watches your app files, so you can leave it running while you make the changes below. It will reload things as needed on save.
First let’s make one small change to app.ts:
// change "allow" field to AuthAllow.authorized
r.add("get", "/", {allow:AuthAllow.authorized}, helloWorld);
Notice that if you left ds-dev running, the app sandbox should have run again and reloaded the routes. The “App Routes” listing shows the same route as before but with “Auth - ”, indicating it’s a route that is only accessible to an authorized user.
Now reload the http://localhost:3003 tab.
Oops! you should get “403: Forbidden”. This is because this route is only accessible to an authenticated user who was added to the appspace, and we have not done that yet.
Note:
If you don’t get 403, check to make sure you don’t have a service worker running on localhost. Go to “Application” tab of you browser dev tools and find the Service Worker panel. Unregister it if it’s there.
3. Hello Friend
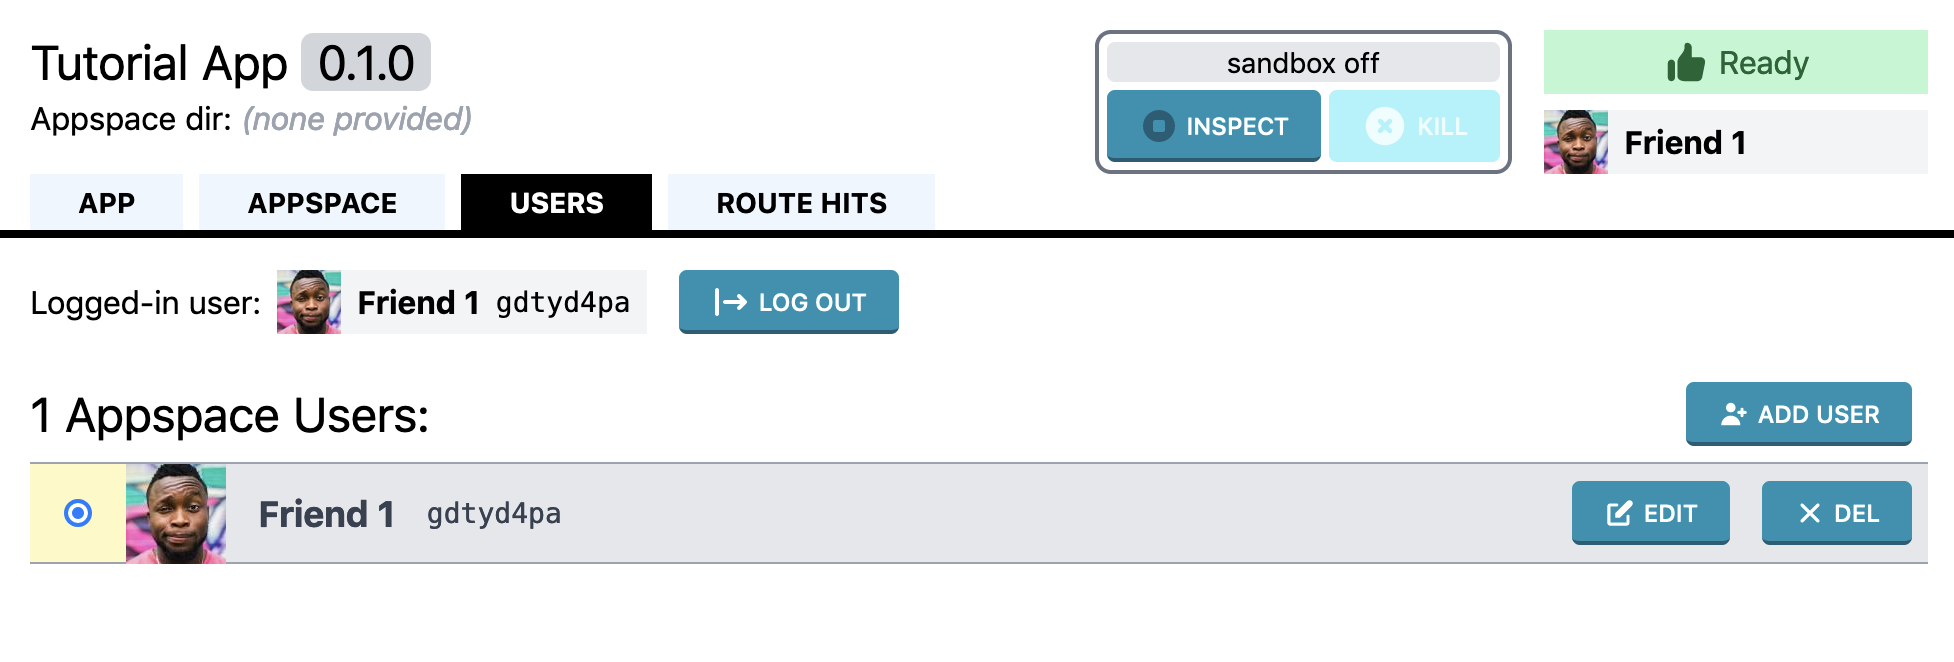
Let’s create a user. In the “Users” tab click the “Add User” button. Give your user a name like “Friend 1” and pick an avatar. (ds-dev has avatars baked in to speed up the process of creating a new user for testing.)
Next, make this the active user by clicking the radio button on the left side of the listing. The UI now shows that “Friend 1” is the “Logged in user”. This means ds-dev will interpret all incoming requests as if they were from “Friend 1”.
Now reload the http://localhost:3003 tab. You should get “hello world” again. Back at the dropserver-dev/ tab, you should see a route hit, and the user for that hit is indeed “Friend 1”.
Now let’s get more personal by getting information on the authenticated user. First, let’s keep the returned value of createApp as app.
const app = createApp({
	routes: r.routes
});
We can then use app to interact with the Dropserver system. For now let’s get more info on our authenticated user so we can display their name. Change the handler to this:
import { Html5Entities } from "https://deno.land/x/html_entities@v1.0/mod.js";

async function helloWorld(ctx:Context) {
	if( !ctx.proxyId ) throw new Error("Expected an authenticated user");
	const user = await app.getUser(ctx.proxyId);
	ctx.respondHtml(`<h1>Hello ${Html5Entities.encode(user.displayName)}</h1>`);
}
ctx.proxyId is a string that uniquely identifies the user in the appspace. Note that it is called a “proxy” because it has no identifying value outside the appspace: the same user in a different appspace will have a different Proxy ID.
Note:
We’re returning HTML now so it’s important to HTML-encode the strings we can not trust, such as user.displayName.
If you reload the root page you should see your user’s name in the greeting.
4. Serve Static Content
So far the one route we have is handled by our app’s code in the sandbox. It is also possible to serve files directly without invoking the sandbox.
To demonstrate we will load our user’s avatar using a static route. Add this route to your app:
r.add("get",
	{path:"/avatars", end: false},
	{allow:AuthAllow.authorized},
	r.staticFileHandler({path:'@avatars/'}));
Here we declare the path as an object with the property end: false. This is basically equivalent to /avatars/* and means that requesting /avatars/some-file.jpg will match this route.
To get the host to handle the static file serving, we use a special handler from the RouteBuilder class: r.staticFileHandler(...) with the path pointing to the files we want to serve.
We use the path prefix @avatars to identify the special directory that contains the avatars for the appspace. To serve files from the app dir use the @app prefix, and to serve from the appspace files dir, use @appspace.
Save app.ts and let the sandbox reload the app data. You should see the new route in the routes panel. Note that loading /avatars/ results in a 404: the static file server does not serve directory listings.
Let’s now change the helloWorld handler to return some minimal HTML that loads the user’s avatar:
async function helloWorld(ctx:Context) {
	if( !ctx.proxyId ) throw new Error("Expected an authenticated user");
	const user = await app.getUser(ctx.proxyId);
	ctx.respondHtml(`
		<h1>Hello ${Html5Entities.encode(user.displayName)}</h1>
		<img src="avatars/${user.avatar}">
	`);
}
If you reload the page you should see the user’s avatar below the greeting. You will also notice an additional route hit for the avatar.
Finally let’s demonstrate that static assets can be served without using the sandbox:
- Use dev tools or right-click on the avatar to copy its URL.
- In the
ds-devUI click the “Kill” button to turn off the sandbox. - Now try loading the avatar by pasting the URL in the address bar.
- Notice that the route hit was registered on the host, and that the avatar loaded, but the sandbox did not start.
Serving a file statically consumes far fewer computing resources compared to using the sandbox. For this reason it is a good idea to leverage this capability when it makes sense.
5. Debugging
As your app gets more complex, it is just a matter of time before it doesn’t work as expected and you need to figure out what is going on. A first reflex can be to slap console.log statements in the suspect parts of the code. Let’s see what happens if we add a log statement to our helloWorld handler:
const user = await app.getUser(ctx.proxyId);
console.log('user', user);	// add this console.log
Load the ”/” page to trigger the handler again. You will see that the appspace log includes the output of the console.log statements.
If that’s not enough to sort out what is happening, the next step is to use the debugger.
- In
/dropserver-dev/click the “Inspect” button. - Now reload your ”/” page again. It will appear to hang.
- Back in
/dropserver-dev/tab, the appspace log tells you that Deno is waiting for the debugger to connect. - Fire up the Chrome web browser (other browsers may work too, but I haven’t tried) and visit
chrome://inspect. There you should see a remote target for Deno. Click “inspect” - Click “Add folder to workspace” and add
tutorial-app/. (You only need to do this once.) - Open
app.tsand set a breakpoint in your handler. - Click the debugger’s “Resume script execution” button. It should stop again at your breakpoint where you can inspect variables and step through as needed.
When you are done click the “Inspect” button again to let the sandbox start normally on next execution.
6. Migrations
So far we have not touched the appspace files directory, which is where data for the appspace is stored. It’s the only directory that is writeable by your app on the system, and is exclusively used by the appspace. We could just use Deno’s apis to write to a file there, but before we do it’s important to talk about migrations.
As your app matures and you release new versions, you may want to change how the data in the appspace files directory is arranged. This might mean creating a new directory to store image files for a new feature, or adding a column to a database table (more info on how to use databases in Dropserver will come later).
In Dropserver we refer to these changes as migrations, and they help make app code more robust and simple by guaranteeing that the appspace’s files are arranged as expected. Each arrangement is referred to by a “schema”, which is an integer value.
To demonstrate migrations we’ll create an empty text file to which we will append the names of our friends who visit the appspace.
Let’s add this code to our app.ts:
import {
	createApp,
	RoutesBuilder,
	AuthAllow,
	MigrationsBuilder	// add MigrationsBuilder
	} from 'https://deno.land/x/dropserver_app@v0.2.2/mod.ts';

// ...

const m = new MigrationsBuilder;
// create a migration from schema 0 to 1:
m.upTo(1, async() => {
	await Deno.create('visitors.txt');
});
// It's a good idea to add a down migration that reverses the changes if possible
m.downFrom(1, async() => {
	await Deno.remove('visitors.txt');
});
Then add migrations to our createApp call:
const app = createApp({
	routes: r.routes,
	migrations: m.migrations
});
Save app.ts and take a close look at the /dropserver-dev/ tab. In the “App” tab you can see that Schema is “1”, while in the “Appspace” tab the Schema is “0”. By creating a migration to schema 1, we told Dropserver that this version of the app expects the appspace to be on schema 1. Meanwhile, the appspace directory is blank so it is Schema 0.
The appspace status is “Migration Required” which means it is unusable. Any request to the appspace is blocked to prevent running the app while the appspace files are not in the correct schema. Go ahead and try loading ”/” page of the appspace now, you will get a 503 Service Unavailable.
Let’s run the migration to fix this. In the “Appspace” tab select “1” in the migrations drop-down and click “Migrate”. This fires up a sandbox to run the code that creates the blank visitors.txt file. You’ll notice the appspace schema is now 1 and the appspace is “Ready”. You can also open a file explorer at the “Working Dir” location and see an empty file at data/files/visitors.txt.
Note:
In ds-dev migrations are run manually to give you more control and to permit debugging the migration code. In ds-host migrations are run automatically as needed when the app version changes.
Now let’s change our handler to log each visitor:
async function helloWorld(ctx:Context) {
	if( !ctx.proxyId ) throw new Error("Expected an authenticated user");

	// first read file to get past visitors:
	const visitors = await Deno.readTextFile('visitors.txt');

	const user = await app.getUser(ctx.proxyId);

	// append visitor name to file:
	await Deno.writeFile(
		'visitors.txt',
		new TextEncoder().encode(user.displayName+'\n'),
		{append:true});

	ctx.respondHtml(`
		<h1>Hello ${Html5Entities.encode(user.displayName)}</h1>
		<img src="avatars/${user.avatar}">
		<p>${visitors.split('\n').map(Html5Entities.encode).join('<br/>')}
	`);
}
Now if you reload the ”/” page a couple of times you will see the user’s name show up. You can also create another user, and load the page as that user and see that their name shows up in the visitor log.
Hello, Dropserver App Developer!
This concludes this tutorial. I hope it has given you an idea of the concepts of Dropserver apps and a sense for the developer experience. Mostly I hope you’re inspired to create some fun little apps!
Where to go next:
- Spot an issue? Report them here: dropserver_app issues and ds-dev/ds-host issues
- Looking for a more complete example? Check out the Leftovers app
- Question or comment? Find me on Mastodon, Bluesky, or on my site.